Monday, July 8, 2013

Project Complete: Scout woven tee


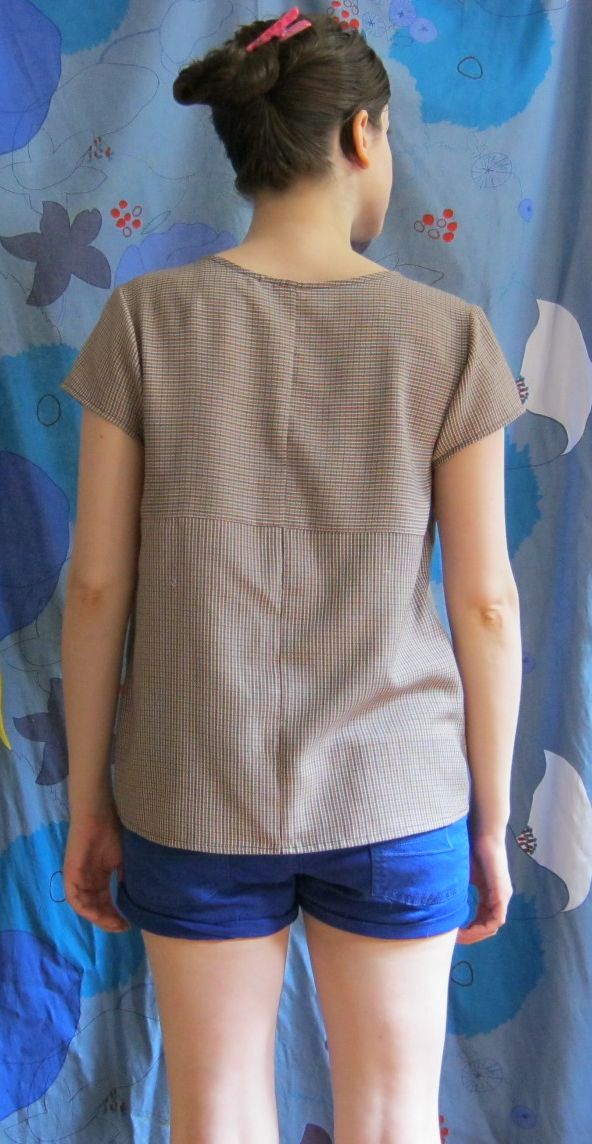
I actually finished an item for a sew-along! I'd been eyeing the grainline studio patterns for a while now, so when I saw that there was a sew-along for the scout woven tee, I was excited to give it a try. I don't generally find loose styles very flattering on me (short with a small frame), but I was interested enough in this pattern to try something outside of my comfort zone. I'm glad I did! The floaty style is lovely in this heat!


This is actually a make do and mend type project - I was worried enough about the style suiting me that I thought I would try and make it out of an old mens skirt I had lying around. It is a poly/cotton blend and one of the softest drapey fabrics I've ever worked with. I tend to be a bit of an anti-poly snob, but this fabric is lovely.

Here's a close-up of the print - a very small scale plaid.


I had to do some creative cutting to have enough fabric, but I actually like the look.


Patterns notes:

I used size two on the top, and traced out to 4 on the bottom, other than that no changes!


Just to prove I'm serious about this sewing blogger thing I present a picture of my cat getting in the way.

Thanks for checking out my post!


Thursday, July 4, 2013

Project Complete: Burda Bodice and half circle skirt


This is a Burda pattern from the 04/2013 issue. When I first bought this issue this pattern was one of my favourites, but a pretty impractical choice for me seeing as how it needed to be matched with a high waisted item. This inspired me to make a simple half circle skirt (my first!) to fill in this hole in my wardrobe. I also have a few nice vintage blouse patterns which I have been wanting to try out, so this skirt will hopefully come in handy. I used the awesome drafting instructions from this post at byhandlondon, and construction tips from elegantmusings. I used some light chambray I got downtown for 10$ a yard, and the skirt took about 1 1/4 yard to complete. Making this was incredibly easy and relaxing and I definitely plan on making more. I really like the more casual silhouette of the half circle skirt. 


For the Burda pattern I used some fabric from a damaged yukata I found in my highschool stash, which I recently had to sort through as my parents are selling their house of 21 years. Pretty much my stash just doubled - one thing that prompted me to join the stashbusting challenge! I am fast running out of space in my shared one room apartment... 

Wish I'd noticed how wonky the buttons looked before I took this picture.


Pattern notes:

Like I generally do with Burda patterns now I made it in the size down from what my measurement would call for as the correct size, in this case 36. Instead of using hook and eye tape like the pattern called for I added a button placket, and am still not positive I did it correctly (I think I might have added too much to the front about an extra inch? I ended up taking out an inch dart in the back - opps). I aligned the straps in 1/2 inch and removed 1/4 inch slant at the shoulder seams for to sloping shoulders. I also lowered the back panel 2 inches, and took 1/2 inch off of the sides on both centre panels. I think that's all?


I've been reading a lot about fitting methods lately so I think I went a bit overboard, I'm not certain beyond the back centre piece anything really needed to be messed with so much. It's funny that in the image above the top has gotten caught on the waistband of the skirt and looks so sloppy! But I only took a couple pictures of the back and this the better one.


I also noticed I actually have a few followers on bloglovin (!) - so I'm going to sign up and add a link, even though since the demise of google reader I've been following people with feedly.

Thanks for checking out my project!


Thursday, June 6, 2013

Vintage Kimono Fabric Bag

Since I have not managed to actually finish any garments since I last posted I thought I'd share some pictures of a bag I made my mother for mother's day.


I used some vintage kimono silk fabric that I bought off of etsy... I have a mini horde of the stuff now, because if you're like me and love both vintage and Japanese textiles this kind of etsy buying is hard to resist.


I used a modified pattern from a Japanese sewing magazine called Pochee from the spring 2007 issue. This is one of the few Japanese sewing magazines I own and none of the garments I've made from it have ever turned out (I can't pull off the charming sack look!), but this one magazine has a lifetimes supply of lovely and simple bag patterns so it was worth the purchase.


My only real changes to the pattern included using a sewn button instead of a knot to join the straps and adding inner pockets. I also interfaced the bag section with old pants wool and fusible interfacing to give is a sturdier body.


I really enjoyed turning the old textile into a new object. My mother seemed to like it, though she might be biased! 

Friday, May 10, 2013

"The Sultry Sheath" from Gertie's Book for Better Sewing


First finished project from the book! All in all a good sew. Weekend date, summer nights dress? After this one I need to make some more casual pieces. But this was one of my favourites from the book and I felt it would be a really good fit with this fabric so I couldn't resist giving it a try.


Construction notes:

I made this in some Nani Iro double gauze fabric I had been hoarding for a couple of years. When I made my muslin I noticed that the shoulder straps were sitting on my outer shoulders but looking at the photo in the book I decided that was how they were supposed to look. That was a mistake, as when I made my original bodice the straps kept slipping down my shoulders! I think the fact that the double gauze was softer then my muslin made the problem worse. I often sew using my high bust measurement because I have narrow shoulders so I'm not certain this would be a problem for everyone (due to my fit issues) but it's worth looking out for. Luckily a poster on patternreview.com who had made the pattern mentioned taking a wedge out of her shoulders to draw them up, so I decided to try a similar tactic:


I drew a wedge which was 1" at the neckline on both front and back and then cut out the wedge and closed it. I then traced the new pattern. I also lowered the armhole by about 1/2" using my french curve. Once I did that (and tried it out on a new muslin) I luckily had just enough Nani Iro fabric left for a second bodice.


The Fit is still not 100%. I traced the pattern using my high bust measurement (size 2 in the book) and tracing out to the next largest size for the waist (4), and then went from 4 in the waist to 2 in the hips. I should have just used a 4 in the hips as well because I think the pulling in the back is due to it being a bit too tight (it also feels a bit tight in the hips when I sit, but nothing that will stop me from wearing the dress). I'm closer to the listed measurement for 2 so I guess my advice would be to size up if you're between sizes unless you like it tight.


I didn't follow the instructions to the letter, as can be seen here with my invisible zip. I'm not sold on lapped zips unless I'm trying to make something completely authentic to a period. Plus I need to use up my collection of invisible zips. One side of my zip top is a couple of millimetres longer then the other! erg. "Only I will notice" is my sewing nitpicking mantra.


This was actually my first time making an all in one facing. I think it's a new favourite way to finish a garment. I did a kind of time consuming and fiddly finish to it where I used my decorative scallop stitch and then trimmed it down. I've actually done this before and it held up well, but it's hardly efficient, I just like the look!


And finally, I used a trick I read in Lynda Mynard's Couture Sewing Techniques and reinforced the back slit with a metal hook and eye bar. 

Final Thoughts:

I think I'm definitely going to come back to this pattern again! Other then the issues with the straps and the fact that I should have used a larger size hip, the pattern was very straight forward. The instructions were easy to follow, although I did not to use some of the more 'couture' techniques.


Wednesday, May 1, 2013

"Bombshell" Tiki Dress done at last!

Hello abandoned blog, nice to be back.

After working on it tiny increments at a time I'm finally finished my Bombshell dress from Gertie's craftsy.com course! This project took me almost a year to complete? Not that the construction was quite that time consuming, but I kept forgetting to get certain materials or having to order things online and so it just kept getting put aside in favour of other projects. But finally everything came together and I have a lovely and impractical dress perfect for pretty much one thing only, visiting my local tiki bar. A good excuse to drink zombies I guess!

Looking Cross.

And trying to smile.
 I really need to get better with the self timer. It's pretty awkward. Songza has a tiki playlist which I listened to while taking these pictures but I'm not sure if that made me feel less silly or just made it worse. Nerd out here if you want. 

This dress was a lot of fun to make, and I definitely recommend the course. I held off for a while because I wasn`t sure how much I liked the pattern but I really wanted to take it, and the dress has grown on me. I was worried that a bustier style like this would look odd with my A cup, but all in all I think its pretty flattering. I prefer how it looks with the halter strap, however it stays up really well as a strapless dress thanks to all the construction details. 


Construction Details:

Might miss some notes since this took such a long time to complete... 
The material is a cotton I bought off a seller on etsy. I think it was a nice fit with the pattern because it has a tiki vibe without being a straight-up Hawaiian print. I messed around with the fit of the cups a lot. Once I had taken out fullness from across the cups as directed in the videos they were scandalously tiny so I redrew the  bustline of the top cup peices. I did not lengthen the bodice but I`m a bit short waisted so I think it turned out fine. I was not sold on the side gather when I did it, but after several tries I just accepted it and now I think it looks good, so I suppose that's a lesson not to get too critical before I see the final piece.


It's lined with the finest vintage sheet cotton. The spiral steel boning was expensive, I had to cut corners somewhere! The grosgrain for the waist stay was sent as a bonus from a etsy fabric seller! I also could not find thin batting for lining the cups as described in the course so I used knit sweatshirt material. 


I spent a lot of time trying to match the floral pattern for my bodice only to have it fail. Oh well! Also, I made   lapped zipper even though I was using an invisible zip. lol!

Final thoughts:

All in all, had a lot of fun making this dress and am quite pleased with how it turned out. Might finesse the cup fit and make another in a more casual fabric with a dirndl skirt and sewn in halter straps. Learned a ton in the course! 


Sunday, April 15, 2012

Colette Spring & Summer Colour Palette


image sources clockwise from top left:

I decided to participate in the Colette Spring & Summer palette sewing challenge! I've been following the Colette sewing blog for some time - I also own the Negroni and Éclair patterns, which I haven't had a chance to try yet, so I'm excited I'm  finally going to try to do one of the sew along challenges. It also helpfully happens to be my break between the winter and summer semesters right now so hopefully I won't get side tracked like I often end up allowing myself. I'm hoping to focus on feminine classics in colours that will complement what I already have in my wardrobe (tons of red and black basically). 

Tuesday, February 28, 2012

Nani Iro print Valentine's 1960s dress

nani iro fabric, 1960s dress

I actually kind of hate this dress, but I'm hoping it's just residual resentment from how frustrating it was to make and one day I'll grow to love it.

Well this dress was a bit of an odyssey.
I had wanted to make it as a Christmas holiday party dress, just sometime cheerful and pretty to wear out for drinks or to family dinners. However exam time conspired against me and I had exams until the 20th and then only 3 days until I had to ship out to Guelph for labyrinthine Xmas fun-times. Ugh Christmas. I love Christmas in theory, but sometimes not so much - especially in that Christmas takes evolved time management skills or you get overwhelmed fast. So, yes, no Christmas dress. But luckily there's Valentines, another time of year in which it is traditionally sanctioned to wear pretty red dresses. But it's being posted late because even though I finished it on the day before Valentines I had a nasty cold (so no date!), which I've been fighting off since - which in my case means becoming unphotogenic to the max... gray skin and acne, so sexy.


Then there was the fabric itself. I ordered it from Japan because I love Nani Iro prints so much, and red is my favourite colour - so I was pretty much seduced. However completely out of my budget as far as fabrics go... 22$ a yard? No thanks. But I guess in this case, yes please. I only bought 1-1/2 yards, so I had to make do in terms of patterns. I ended up splicing two vintage 1960s dress patterns together: The bottom from Simplicity 5355 and the top from Vogue 6463... they went together ok, but it was far from smooth sailing with this fabric!

The fabric is a bit stiffer and lower quality then I was expecting, given that the other Nani Iro fabrics I've bought have been so lovely... If anyone out there is eyeing the 'brushed cotton' my 2 cents is that it's better suited to home dec or bags, something where drape is not crucial.
Anyway due to the unforgiving drape I needed this dress to fit perfectly ... I'd made the bottom of Simplicity 5355 before so I wasn't expecting any issues but the back fit was not very faltering... kind of a butt poof of sorts. I lengthened the darts and curved the stitch line and that helped a little. The bodice also had some fit issues which didn't show up in my (softer) cotton muslin... It needed to be shortened significantly, but since it was already cut I reduced the length at the shoulders. I also attempted a lapped zipper using this tutorial from A Fashionable Stitch, with mixed results. The first time it caused the side seam to bulge, so I took the seams in but it's still more prominent then I like.

Things I like: The fit is fairly flattering from the front. I like the tight 1960s cocktail look (which is what I was going for).
nani iro fabric, 1960s dress


I also like - the lovely print! What an amazing textile design.
nani iro fabric, 1960s dress


I'm less thrilled with:

The prominence of the lapped zipper - seen here on the side. I'm not sure what I did wrong - or if this is just the look? I know on Mad Men the Zippers have often quite noticeable but I still feel like mine looks sloppy. Also not happy with the fullness at the bottom of the back darts. Not a deal breaker, but still. 

nani iro fabric, 1960s dress