Showing posts with label sewing. Show all posts

Thursday, September 18, 2014

Gertie's Book for Better Sewing Shirtwaist Dress - Round One


Gertie's book for better sewing shirtwaist dress


Taking pictures remains my least favourite part of the sewing blog thing. Love reading them, love writing them, love sewing - hate being in front of the camera. I took like 20 shots with my auto-timer and ended up with two. But that's ok! I can still share my thoughts about this pattern and a few construction details!

Gertie's book for better sewing shirtwaist dress


Pattern Notes:

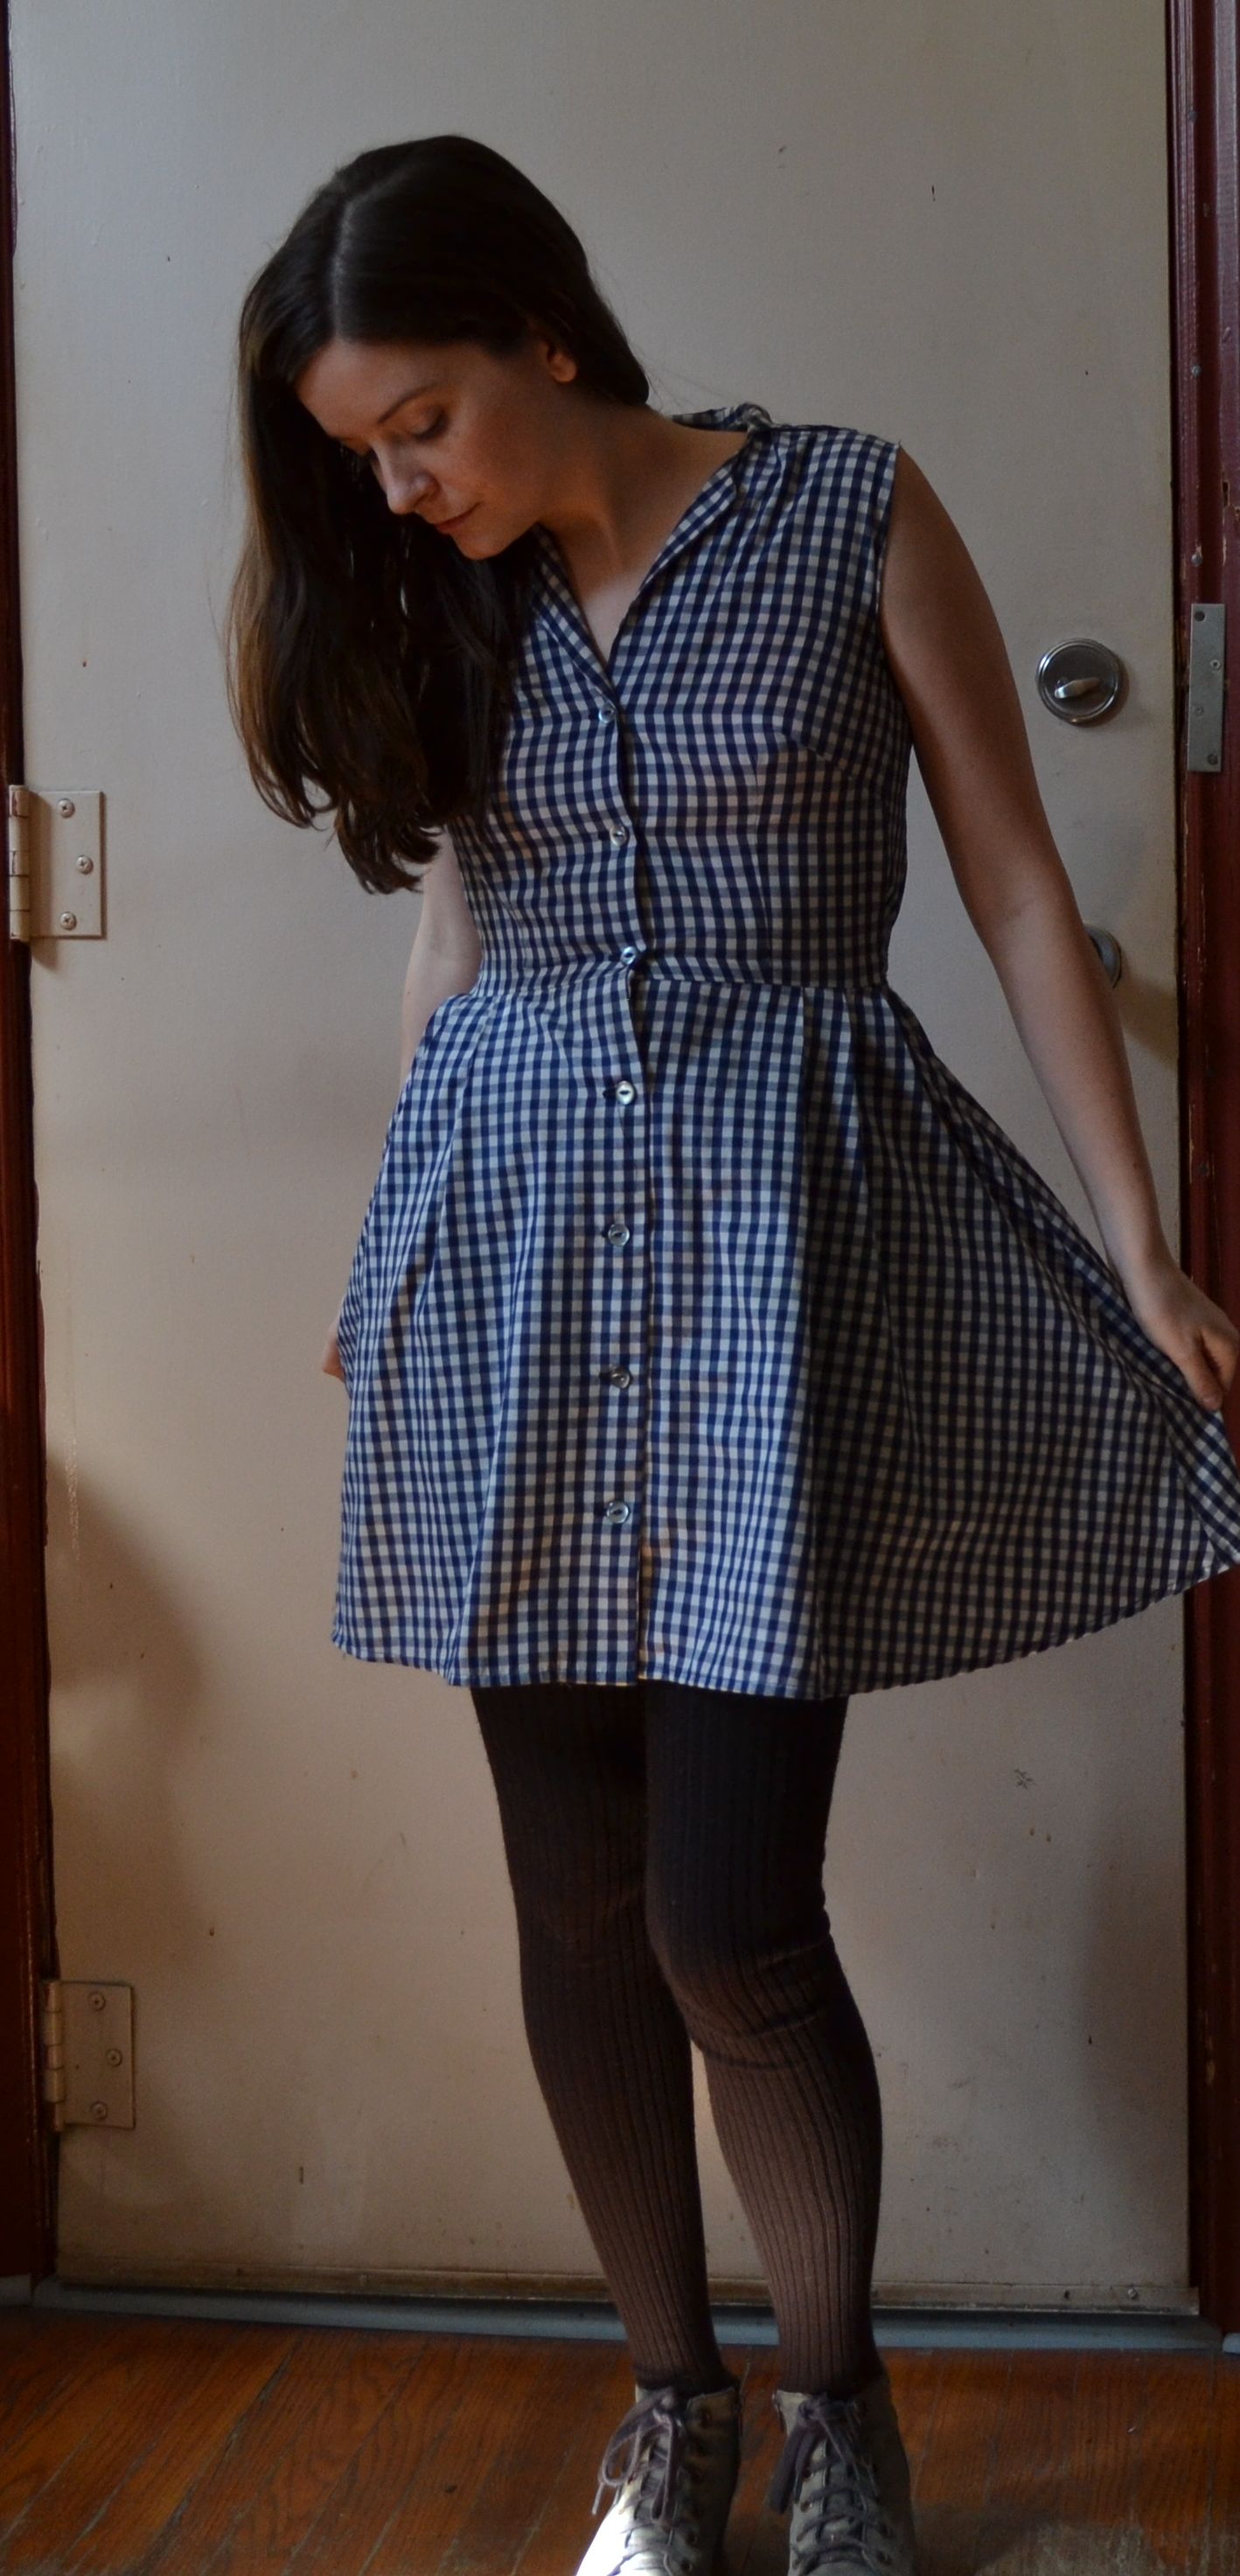
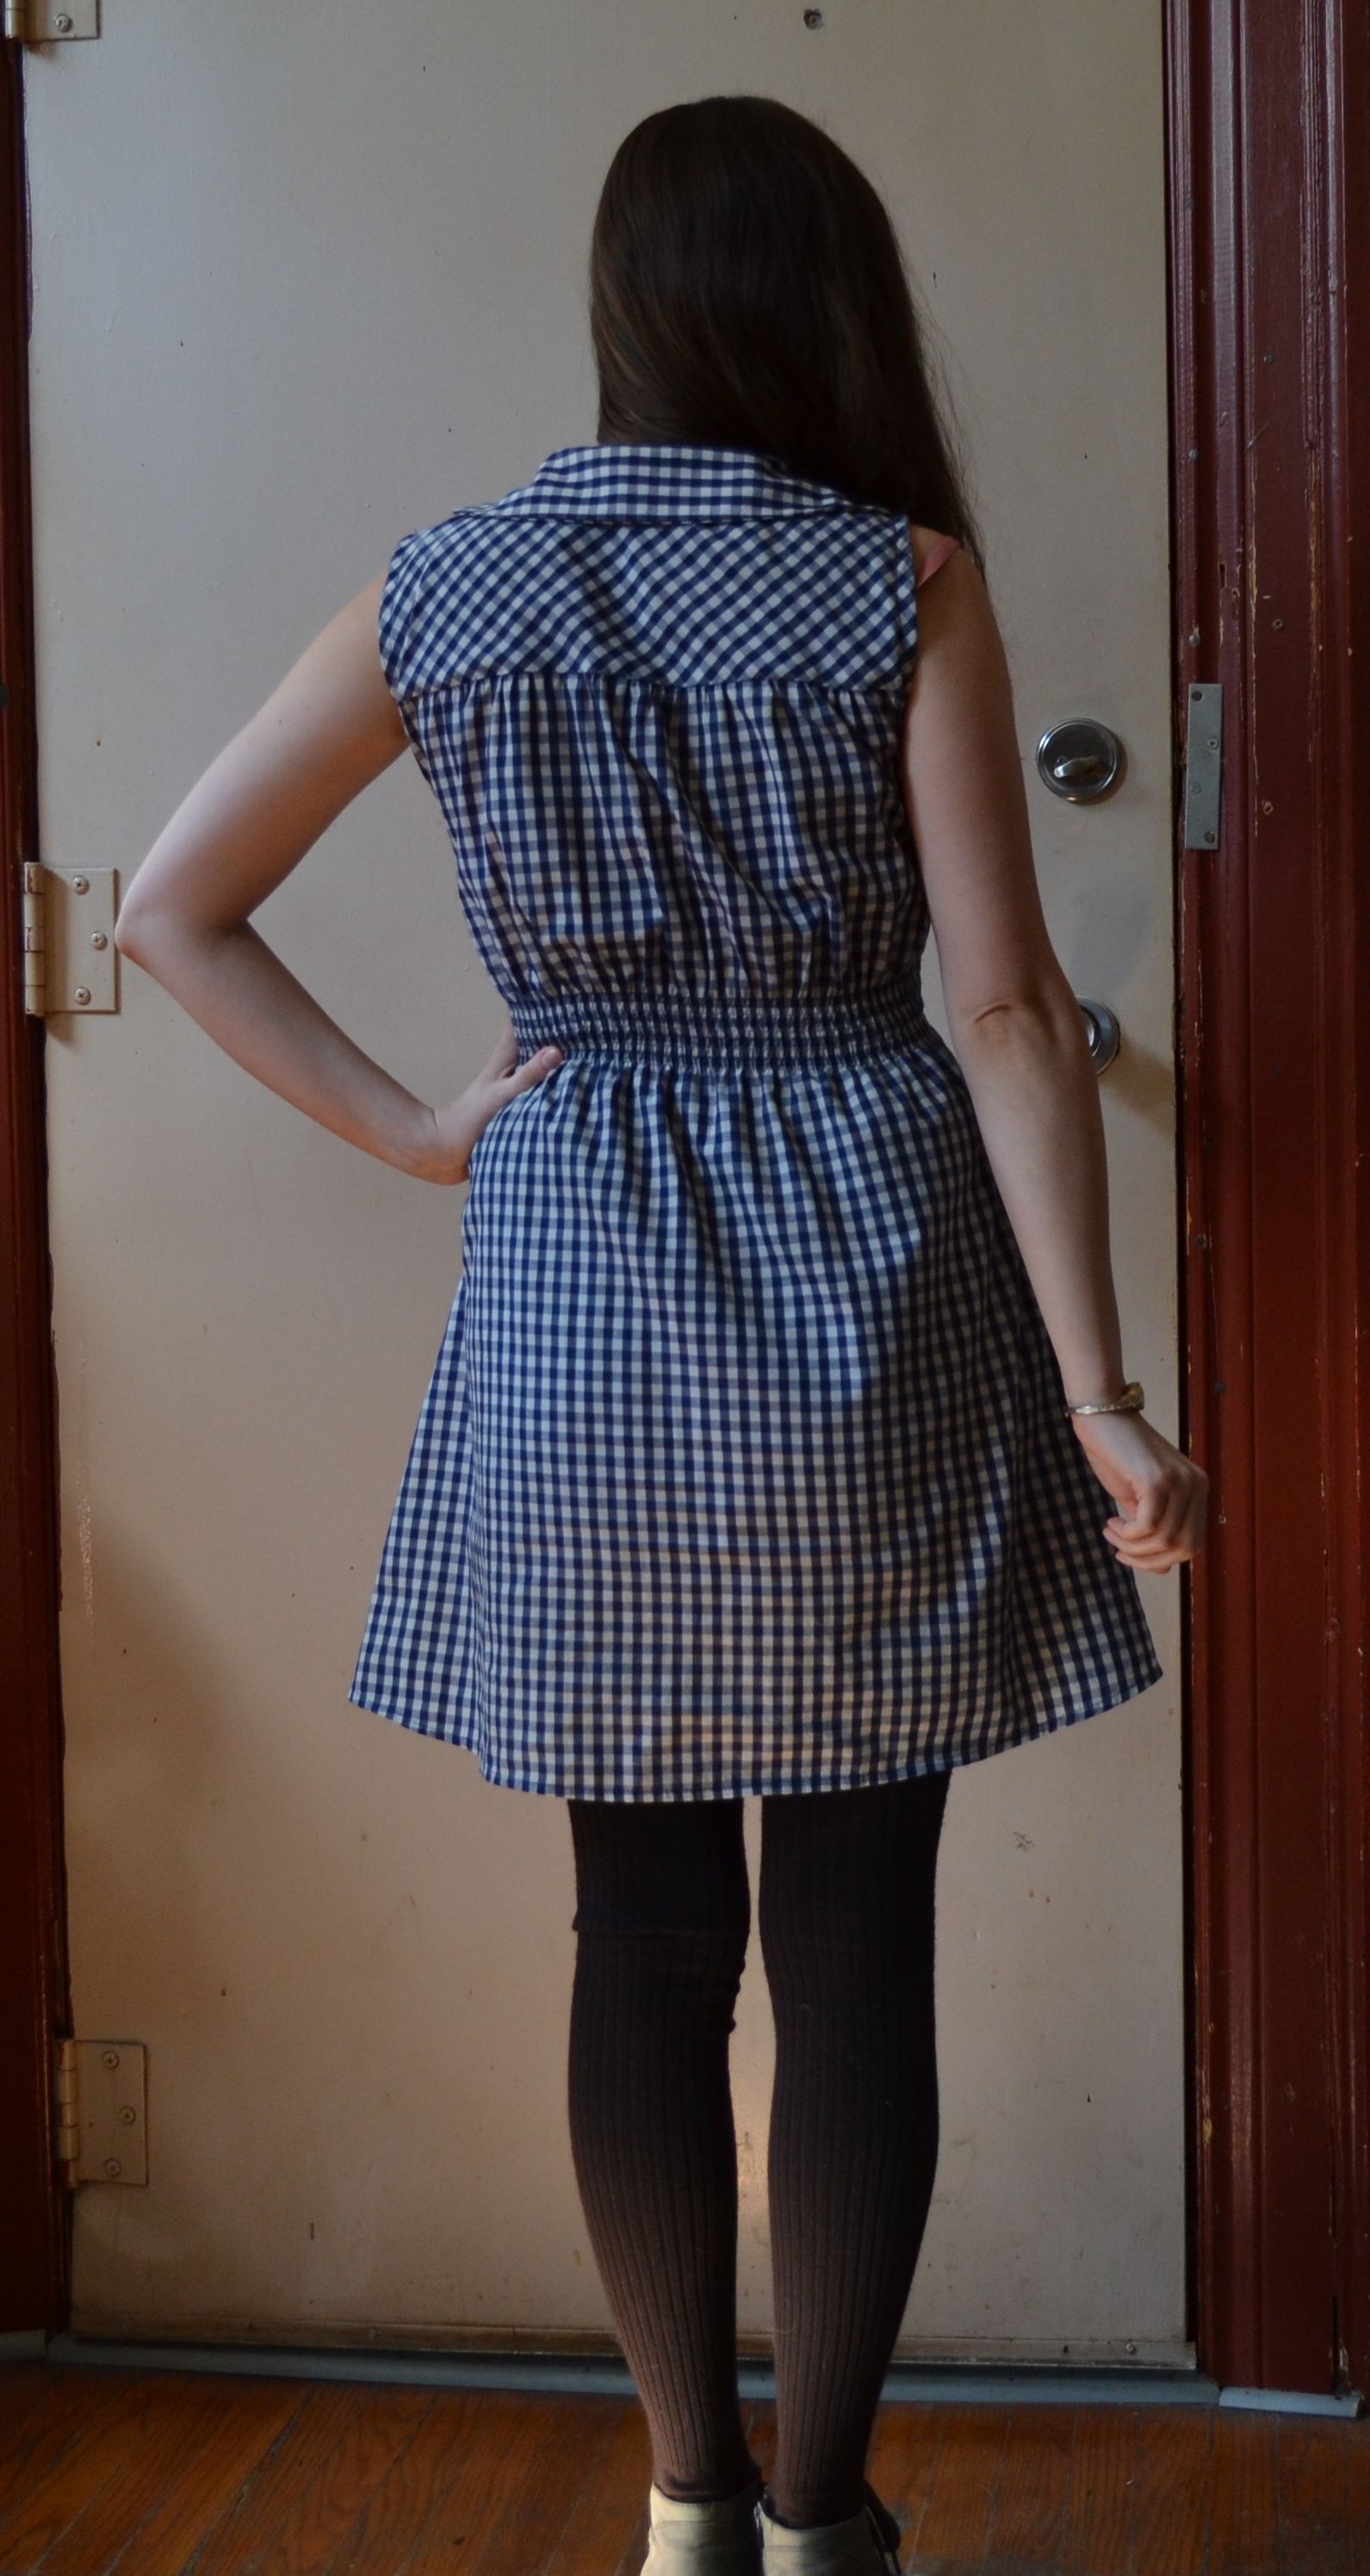
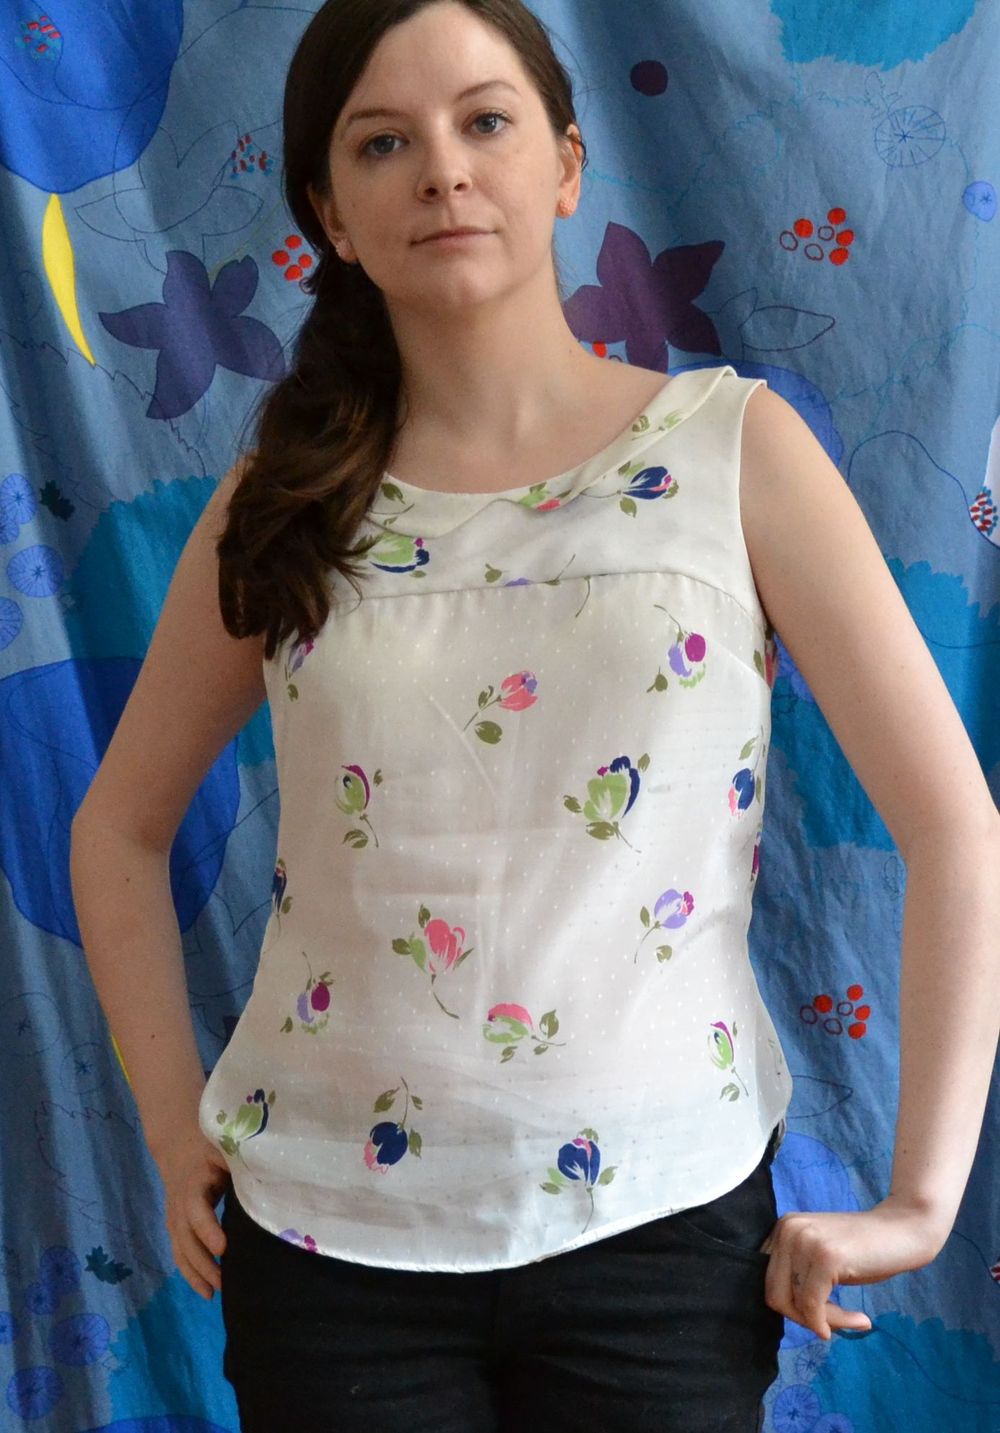
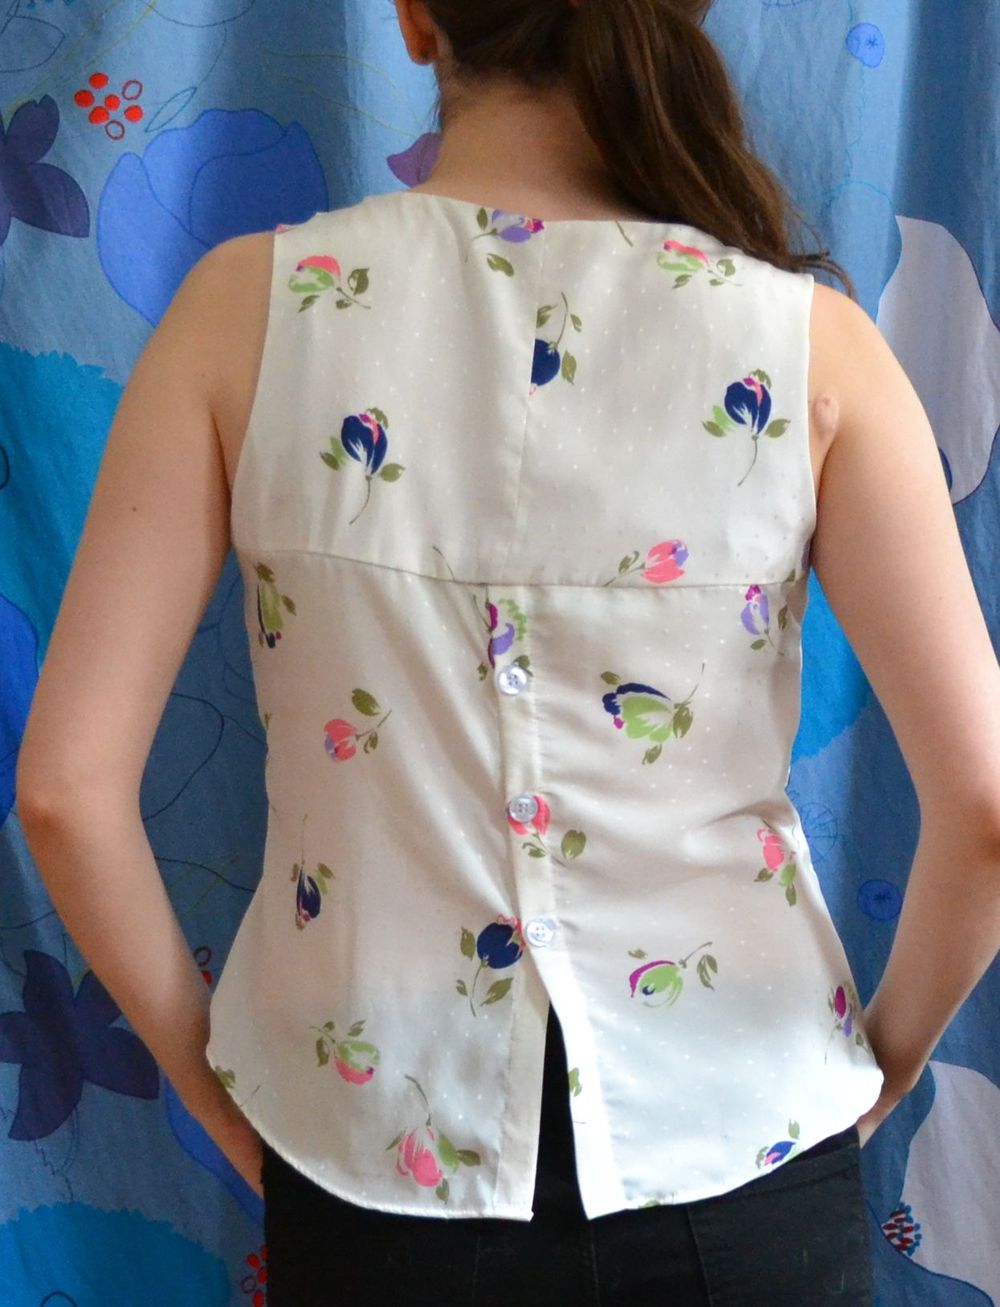
This is the Shirtwaist Dress from Gertie's Book for Better Sewing. This is on the third project I've tried from the book, and yesterday I just received Gertie Sews Vintage Casual. So many things from these two books that I want to make! This was a wearable muslin, so no changes except that I left the sleeves off. I just wasn't feeling the puff sleeves in my fabric (Edited to add I also shorted the dress by about 4 inches to make it mini instead of tea length). I made a bust 2 waist and hips 4, and honestly maybe should have gone up a size at the waist. It's very comfy because of the back shirring, but pulls forward at the side seams a bit.

I did have a few issues with the pattern. The collar fit is off on me in that the back collar piece sits so far back that you can't really see it from the front. Also the front facing at the collar has a tendency to pop out, a flaw I think might be an easy fix by just making the facing about an inch wider. The last issue I have with the pattern is that there seems to be some excess fabric around the shoulder area. I'm currently making a version for a friend and my muslin for her had that issue as well.

Positives for this pattern: It's extremely comfy, as I mentioned before! I really like that the shirring allows for a more vintage fitted silhouette but with lots of ease around the waist. Very nice to everyday dressing. This is one of the most comfortable dresses I have, so despite the minor fit issues it gets worn a lot. Like weekly. The cheap poly I used is actually starting to pill a little from how much I wear it! Second bonus: My boyfriend really likes it :) It's kind of silly but I was less than impressed with the dress when I finished it until he said "what a cute dress!" which caused my to change my opinion pretty fast... What can I say? It was a good complement.

I actually sewed a reasonable amount this summer so hopefully I can catch up on some more posts now that fall has begun to set in in Toronto. We shall see. As always thanks for checking out my post!  


Monday, June 16, 2014

I made a nettie!

brown polkadot nettie


I made a closet case files nettie! I fell in love with this pattern as soon as I saw it, and knew I wanted to give it a try even though I have not tried sewing with knits in years, and don't really like bodysuits that much. I'm glad I gave it a try because even though it didn't turn out perfect, it does make me feel like a total babe, which is rare for me and very nice! Such is the power of the nettie.

brown polkadot nettie back

Sewing notes

I made it in size 8 which would be size 6 in the current version. I really like how dramatic the low back view is, and I find scoop necklines to be flattering so that was what I decided to try. One of the silver linings of having a small chest is not needing much support, so I only included the shelf bra, not the cups. For my A cup the shelf bra feels like it has about as much support as a regular soft bra, so I'm pretty pleased with how it turned out. Having not sewn much with knits I struggled a bit with the neckband. I had to rip out my first try because it was uneven. Ripping zigzag is time consuming! Advice for knit novices: zigzag binding along edge before sewing in, as my major issue the first time was the neckband curling as I stretched it, which led to unevenness. Also I found it much easier to sew in when I added extra pins between the main four which are measured. I cut it to be a long shirt instead of bodysuit, as when I pulled it down to close the snaps I didn't like how low it made the neckline on me.
The only negative I have for my version (first try!) is that the shoulders are a bit prone to slipping. Not a top for dancing or vigorous activity. I'm not 100% on why it's happening. A couple guesses are that the shelf bra is pulling the back too far forward (the side seam is certainly very pulled forward), or I need to make a bigger size, or maybe my fabric has no lycra? The content was unmarked so I could only test stretch percentage.


I loved making it and I have plans for like... six more. So highly recommended if you were thinking about giving it a try!


Friday, May 9, 2014

Datura refashion / wearable muslin

front

Lately most of my sewing projects have been failures, and I really can't gather the will to blog about them. This one almost ended up in the failure pile too, but a couple of rough on the fly fixes and I ended up with a top I'll actually wear! 
This is the Datura blouse from Deer and Doe Patterns. You've likely seen this one around! I'm pretty broke so I consider indie pattern purchases a bit of a luxury. It took me a long time to cave and finally buy this pattern. I already have three more planned so I think it will be worth it!

Pattern Notes:

I started  with the size 38. I know doe and deer patterns are sized for a c cup bust, which obviously is not me! This is actually my second try with a D&D pattern. I have a failed Belladone stashed away, waiting for me to deal with it sometime. For the Belladone I did a small bust adjustment, but for some reason this time I skipped it. 

My first hurdle with the pattern came with sewing the yoke together. I could not for the life figure it out. I spent quite some time searching online for someone to explain it, and that just turned up either people linking to a dead french link explaining it, or just commenting on how ingenious the construction is. Ha! I felt like a bit of an idiot. 

Anyways: you turn the front yoke piece so that it is right side out, then place it inside the back yoke piece! ugh. For some reason the wording in the pattern completely threw me. I might try to make a mini photo tutorial to replace the dead french one in case anyone else is out there on the internet confused as hell by this pattern!

Once the yoke was figured out I tried my WIP and the fit was pretty bad on me. The bust dart was quite a bit too low and the whole thing overwhelmed my small frame. In progress fixes I did:
1) take up the straps 3/4"
2) drawing a waist shape into the body like so:


Fabric notes:

datura back

This is actually a refashion from an old unflattering dress I was holding on to because I liked the print. It's a light weight poly and was a little tricky to work with. I'm a still a novice when it comes to slippery fabrics!

I've changed my stash diet rules a bit to deal with my particular situation, which includes lots of potential refashions. Any one finished refashion project (even if it used more than one old piece) counts as one complete "stash" fabric. So not great for counting used up yardage but what I need to get my sewing corner under control!

...Actually I'm just off to visit fabricland on this lovely (warm! sunny!) spring day, and likely use up my whole earned fabric allowance of three pieces!


Wednesday, February 19, 2014

Gingham Negroni for Joshua


Ok,  so crafting resolution #2 attempt 1! I've been wanting to make something for my boyfriend Josh for years now, and finally got around to it. I'm pretty pleased with it for a first try, though there are definitely some things that I'll change for the next try (primarily the length of the shirt body). Also I learned that not only am I bad at taking self timer shots of myself, but I generally suck at photography all around. For most of these pictures I stood way to close to Josh and since he's a good foot taller than me, they all ended up being lovely shots of up his nose. Sorry babe! I also didn't take that many shots since I felt bad about making him model (for no real reason since he was great about it) so had very few shots to pull from. New mini crafting resolution: become better at photography.


gingham negroni 01


Pattern notes:

This is the Negroni pattern from Colette Patterns. I got this back in 2011, so it's been in my stash for a while. I didn't realize that it had a camp collar until I started making it! I think it works but I also want to make Josh a more traditional dress shirt as well, so if anyone has any suggestions let me know!

I used the medium for the most parts but lengthened the body to the xl. I did this because I was comparing the length to that of a shirt my boyfriend said was a good length on him but realized after it was done that long dress shirt = meant to be tucked, versus the short more casual style of the negroni. So that was one new lesson. I want to go back and shorten this shirt at some point.

The only other change I did was slashing and overlapping the sleeve at the midpoint to make it narrower, which was the only change Josh asked for from the muslin. I wasn't really sure at first how to go about doing that while still keeping the cuff and shoulder seams the same size since he was happy with them. After searching the internet the best I could come up with was the inverse of this technique (thanks internet!). I then trued the pattern and proceeded on my way. It seems to have worked but yeah, lots of guesswork in that pattern manipulation theory.


Sewing notes:

Lots of new techniques for me here but not many changes from the pattern. The only major failure was my flat felled shoulder seams. When it came time to press the shoulder seams to the body to be sewn down I messed up the previous pressed fold, and could not get it back as neatly because it was already sewn on. Next time I'm just going to finger press at this point. I think maybe I lack refined pressing skills!


Plackets! Kind of fun, kind of stressful. I bought an edge stitch foot after this project. 


Fabric notes:

I've decided that items sewn for other people are exempt from my stash diet rules, and this was not a stash piece so it doesn't count towards my stash total. However of the 3 yards I bought for this project I ended up with about 3/4 of a yard left (single layer cutting!) so now that leftover counts as 'stash'. 

Been really enjoying watching Project Sewn unfold, and have a couple ideas about the next themes so might submit to the sew along if I can get organized in time!

Friday, February 14, 2014

Lately - Stash busting with mixed results

Deena


  1. A failed wearable muslin of the Grainline studio Tiny Pocket Tee for Stash diet #2. Is the pocket supposed to be kind of slanted at the top? Really hard to tell in that photo, though I expect no...
  2. New Cat Lady poster from Bellwoods brewery. Pretty great, but makes me want fancy beer whenever I look at it!
  3. Stash diet #3. A small success. To get through my stash will require some pretty unexciting projects, which I think is part of the problem. Bought this upholstery weight fabric about three years ago from etsy?


Monday, January 27, 2014

Nani Iro Pastille Dress

nani iro print Pastille


So this is my first completed project of 2014! I've committed to the Stash Diet: 2014 because my fabric buying has been outpacing my project making since I was about 15 and first started going fabric shopping. It's pretty bad. For one thing, I have quite a few pieces that are no longer really my style, so will need to be given up or used in a creative fashion. I think the best (or worst) is a fleece covered with large eyed fawns and berries... I think it might be too saccharine for even a one year old. Oh high school Laurel, wtf.


But not so this fabric. This was pretty much my favourite stash piece, and I wanted to make sure I made something with it while I was still in love.


Nani Iro print Deena bed
Also functions as a fancy Deena bed.


Fabric notes:

This is a Nani Iro double gauze cotton that I've been holding on to for the last two years. It's incredibly soft and the green is a lovely vibrant shade. I think the name of the print was Gentle Cooing, which is kind of amusing. When I want to buy a print I can't really afford I only buy 1 1/2 yards as I know that's the minimum I can squeeze a garment out of. There was pretty much no fabric left as scraps, but it worked!


nani iro print pastille back


Pattern notes:

This the Pastille dress from the Colette sewing handbook which I've owned for a couple years now, it's only my second pattern made from the book, so I guess it counts as stash... using?
I had to make quite a few pattern alterations to make it work but that seems standard from looking at other peoples versions.
I did:
 A small bust adjustment.
Removed 1" from upper back as you would a swayback.
 Lengthened darts - front waist 1", back waist 2", back neckline 1"
removed 1/2 fullness from front and back cap sleeves

I also used a dirndl skirt instead of the straight skirt, but that was due to the fact that I noticed I prefer wearing dirndl skirts more. I do really like the tucks on the original skirt though, so maybe I'll make this again some time.


I'm almost done my Victory beret, so for once I might actually finish a knit/sew-along by the deadline! If so I may have two posts in one week (!?).

Thanks for checking out my project,

Laurel 

Wednesday, December 18, 2013

Merry Hallo'mas! a Glow in the Dark Skeleton Dress

skeleton sultry sheath gerties book for better sewing


This was meant to be my Hallowe'en dress, and I had it all finished in time for Halloween except that I needed to buy and put in the zipper but then I ended up getting sick on Halloween. So since then its been hanging in my closet neglected. However I think now I've talked myself into believing that I can wear this dress just as everyday casual wear. I was pretty fond of goth looks in high school anyway.

Pattern notes:
This is the bodice from the Sultry Sheath from Gertie's Book for Better Sewing again. Pretty much I was in a hurry so I used something where I'd already corrected the fit. The skirt is a simple dirndl. I like the combination of the very feminine neckline with the macabre print.

skeleton sultry sheath gerties book for better sewing close up


Fabric notes:
This is a quilting fabric from timeless treasures which I bought online from ebay. It's an anatomical skeleton print, and oh yeah it glows in the dark! I recommend this bodice pattern with a dirndl skirt as a good one for using quilting cottons you want to wear, it came together really easily.

skeleton sultry sheath gerties book for better sewing print


Sewing notes:
As I said above, this pattern came together really easily with the quilting cotton compared to when I made it with double gauze - definitely beginner friendly and a good match for hard to resist quilting cotton prints.

skeleton sultry sheath gerties book for better sewing scallop finish


I used the scallop edge to finish my facing, but having yet to wash it you can still see fray check here - more of a precaution then anything it won't be visible to the eye after the first washing.

skeleton sultry sheath gerties book for better sewing hem finish


When I tried on my dress to hem it I realized I was really happy with the length it already was. In the spirit of stash busting and cheapness I used some cheap poly ribbon to finish the hem. It actually adds some extra body to the hem, which I like in a '50s inspired dress like this. The poor women's horsehair braid?

Looking forward to Christmas week, starting with a date at Casa Loma which should be all decked out for the holidays this weekend. I think I might wear this dress!

Monday, November 25, 2013

Light Stripes Colette Hazel


I was having a hard time getting proper pictures of this dress because the print is so light, plus before I could take pictures I spilt wine on it and wore it with a red vintage sweater that rubbed red dye on it. Blerg! The Hazel dress pattern is my favourite dress pattern offered by Colette patterns. Even thought my body is pretty far from the type this line of patterns is designed for I think the bodice on this pattern is just too flattering to resist.

Fabric notes:


The fabric is a reproduction from the 1800 hundreds (which speaks of my totally contemporary fashion tastes) which I bought in downtown Toronto for about four dollars a yard. It is a quilting cotton, so a bit stiff, and the winkles in the fabric have proven hard to get out. I really love the way stripes emphasize the lines of this bodice design though.

Pattern Notes:

hazel 04


With Colette patterns I have to make a small bust adjustment, which is what is shown above. I used the method outlined by Anna here. I also lengthened the bodice by an inch, and shortened the straps.

I'm thinking a version in a wool crepe with a half circle skirt might be a good wintertime project!


Monday, July 8, 2013

Project Complete: Scout woven tee


I actually finished an item for a sew-along! I'd been eyeing the grainline studio patterns for a while now, so when I saw that there was a sew-along for the scout woven tee, I was excited to give it a try. I don't generally find loose styles very flattering on me (short with a small frame), but I was interested enough in this pattern to try something outside of my comfort zone. I'm glad I did! The floaty style is lovely in this heat!


This is actually a make do and mend type project - I was worried enough about the style suiting me that I thought I would try and make it out of an old mens skirt I had lying around. It is a poly/cotton blend and one of the softest drapey fabrics I've ever worked with. I tend to be a bit of an anti-poly snob, but this fabric is lovely.

Here's a close-up of the print - a very small scale plaid.


I had to do some creative cutting to have enough fabric, but I actually like the look.


Patterns notes:

I used size two on the top, and traced out to 4 on the bottom, other than that no changes!


Just to prove I'm serious about this sewing blogger thing I present a picture of my cat getting in the way.

Thanks for checking out my post!


Thursday, July 4, 2013

Project Complete: Burda Bodice and half circle skirt


This is a Burda pattern from the 04/2013 issue. When I first bought this issue this pattern was one of my favourites, but a pretty impractical choice for me seeing as how it needed to be matched with a high waisted item. This inspired me to make a simple half circle skirt (my first!) to fill in this hole in my wardrobe. I also have a few nice vintage blouse patterns which I have been wanting to try out, so this skirt will hopefully come in handy. I used the awesome drafting instructions from this post at byhandlondon, and construction tips from elegantmusings. I used some light chambray I got downtown for 10$ a yard, and the skirt took about 1 1/4 yard to complete. Making this was incredibly easy and relaxing and I definitely plan on making more. I really like the more casual silhouette of the half circle skirt. 


For the Burda pattern I used some fabric from a damaged yukata I found in my highschool stash, which I recently had to sort through as my parents are selling their house of 21 years. Pretty much my stash just doubled - one thing that prompted me to join the stashbusting challenge! I am fast running out of space in my shared one room apartment... 

Wish I'd noticed how wonky the buttons looked before I took this picture.


Pattern notes:

Like I generally do with Burda patterns now I made it in the size down from what my measurement would call for as the correct size, in this case 36. Instead of using hook and eye tape like the pattern called for I added a button placket, and am still not positive I did it correctly (I think I might have added too much to the front about an extra inch? I ended up taking out an inch dart in the back - opps). I aligned the straps in 1/2 inch and removed 1/4 inch slant at the shoulder seams for to sloping shoulders. I also lowered the back panel 2 inches, and took 1/2 inch off of the sides on both centre panels. I think that's all?


I've been reading a lot about fitting methods lately so I think I went a bit overboard, I'm not certain beyond the back centre piece anything really needed to be messed with so much. It's funny that in the image above the top has gotten caught on the waistband of the skirt and looks so sloppy! But I only took a couple pictures of the back and this the better one.


I also noticed I actually have a few followers on bloglovin (!) - so I'm going to sign up and add a link, even though since the demise of google reader I've been following people with feedly.

Thanks for checking out my project!


Thursday, June 6, 2013

Vintage Kimono Fabric Bag

Since I have not managed to actually finish any garments since I last posted I thought I'd share some pictures of a bag I made my mother for mother's day.


I used some vintage kimono silk fabric that I bought off of etsy... I have a mini horde of the stuff now, because if you're like me and love both vintage and Japanese textiles this kind of etsy buying is hard to resist.


I used a modified pattern from a Japanese sewing magazine called Pochee from the spring 2007 issue. This is one of the few Japanese sewing magazines I own and none of the garments I've made from it have ever turned out (I can't pull off the charming sack look!), but this one magazine has a lifetimes supply of lovely and simple bag patterns so it was worth the purchase.


My only real changes to the pattern included using a sewn button instead of a knot to join the straps and adding inner pockets. I also interfaced the bag section with old pants wool and fusible interfacing to give is a sturdier body.


I really enjoyed turning the old textile into a new object. My mother seemed to like it, though she might be biased! 

Friday, May 10, 2013

"The Sultry Sheath" from Gertie's Book for Better Sewing


First finished project from the book! All in all a good sew. Weekend date, summer nights dress? After this one I need to make some more casual pieces. But this was one of my favourites from the book and I felt it would be a really good fit with this fabric so I couldn't resist giving it a try.


Construction notes:

I made this in some Nani Iro double gauze fabric I had been hoarding for a couple of years. When I made my muslin I noticed that the shoulder straps were sitting on my outer shoulders but looking at the photo in the book I decided that was how they were supposed to look. That was a mistake, as when I made my original bodice the straps kept slipping down my shoulders! I think the fact that the double gauze was softer then my muslin made the problem worse. I often sew using my high bust measurement because I have narrow shoulders so I'm not certain this would be a problem for everyone (due to my fit issues) but it's worth looking out for. Luckily a poster on patternreview.com who had made the pattern mentioned taking a wedge out of her shoulders to draw them up, so I decided to try a similar tactic:


I drew a wedge which was 1" at the neckline on both front and back and then cut out the wedge and closed it. I then traced the new pattern. I also lowered the armhole by about 1/2" using my french curve. Once I did that (and tried it out on a new muslin) I luckily had just enough Nani Iro fabric left for a second bodice.


The Fit is still not 100%. I traced the pattern using my high bust measurement (size 2 in the book) and tracing out to the next largest size for the waist (4), and then went from 4 in the waist to 2 in the hips. I should have just used a 4 in the hips as well because I think the pulling in the back is due to it being a bit too tight (it also feels a bit tight in the hips when I sit, but nothing that will stop me from wearing the dress). I'm closer to the listed measurement for 2 so I guess my advice would be to size up if you're between sizes unless you like it tight.


I didn't follow the instructions to the letter, as can be seen here with my invisible zip. I'm not sold on lapped zips unless I'm trying to make something completely authentic to a period. Plus I need to use up my collection of invisible zips. One side of my zip top is a couple of millimetres longer then the other! erg. "Only I will notice" is my sewing nitpicking mantra.


This was actually my first time making an all in one facing. I think it's a new favourite way to finish a garment. I did a kind of time consuming and fiddly finish to it where I used my decorative scallop stitch and then trimmed it down. I've actually done this before and it held up well, but it's hardly efficient, I just like the look!


And finally, I used a trick I read in Lynda Mynard's Couture Sewing Techniques and reinforced the back slit with a metal hook and eye bar. 

Final Thoughts:

I think I'm definitely going to come back to this pattern again! Other then the issues with the straps and the fact that I should have used a larger size hip, the pattern was very straight forward. The instructions were easy to follow, although I did not to use some of the more 'couture' techniques.


Wednesday, May 1, 2013

"Bombshell" Tiki Dress done at last!

Hello abandoned blog, nice to be back.

After working on it tiny increments at a time I'm finally finished my Bombshell dress from Gertie's craftsy.com course! This project took me almost a year to complete? Not that the construction was quite that time consuming, but I kept forgetting to get certain materials or having to order things online and so it just kept getting put aside in favour of other projects. But finally everything came together and I have a lovely and impractical dress perfect for pretty much one thing only, visiting my local tiki bar. A good excuse to drink zombies I guess!

Looking Cross.

And trying to smile.
 I really need to get better with the self timer. It's pretty awkward. Songza has a tiki playlist which I listened to while taking these pictures but I'm not sure if that made me feel less silly or just made it worse. Nerd out here if you want. 

This dress was a lot of fun to make, and I definitely recommend the course. I held off for a while because I wasn`t sure how much I liked the pattern but I really wanted to take it, and the dress has grown on me. I was worried that a bustier style like this would look odd with my A cup, but all in all I think its pretty flattering. I prefer how it looks with the halter strap, however it stays up really well as a strapless dress thanks to all the construction details. 


Construction Details:

Might miss some notes since this took such a long time to complete... 
The material is a cotton I bought off a seller on etsy. I think it was a nice fit with the pattern because it has a tiki vibe without being a straight-up Hawaiian print. I messed around with the fit of the cups a lot. Once I had taken out fullness from across the cups as directed in the videos they were scandalously tiny so I redrew the  bustline of the top cup peices. I did not lengthen the bodice but I`m a bit short waisted so I think it turned out fine. I was not sold on the side gather when I did it, but after several tries I just accepted it and now I think it looks good, so I suppose that's a lesson not to get too critical before I see the final piece.


It's lined with the finest vintage sheet cotton. The spiral steel boning was expensive, I had to cut corners somewhere! The grosgrain for the waist stay was sent as a bonus from a etsy fabric seller! I also could not find thin batting for lining the cups as described in the course so I used knit sweatshirt material. 


I spent a lot of time trying to match the floral pattern for my bodice only to have it fail. Oh well! Also, I made   lapped zipper even though I was using an invisible zip. lol!

Final thoughts:

All in all, had a lot of fun making this dress and am quite pleased with how it turned out. Might finesse the cup fit and make another in a more casual fabric with a dirndl skirt and sewn in halter straps. Learned a ton in the course!